The greatest risk in winter mountaineering isn’t the mountain; it’s a summer mindset in a winter environment.
- True safety comes from a discipline of risk management and decision-making, not just owning an ice axe.
- Mastering non-digital navigation and understanding your physical limits are more critical than summiting.
Recommendation: Before buying any gear, build your “competence confidence” by creating a physical training plan and practicing map reading in a familiar, low-risk area.
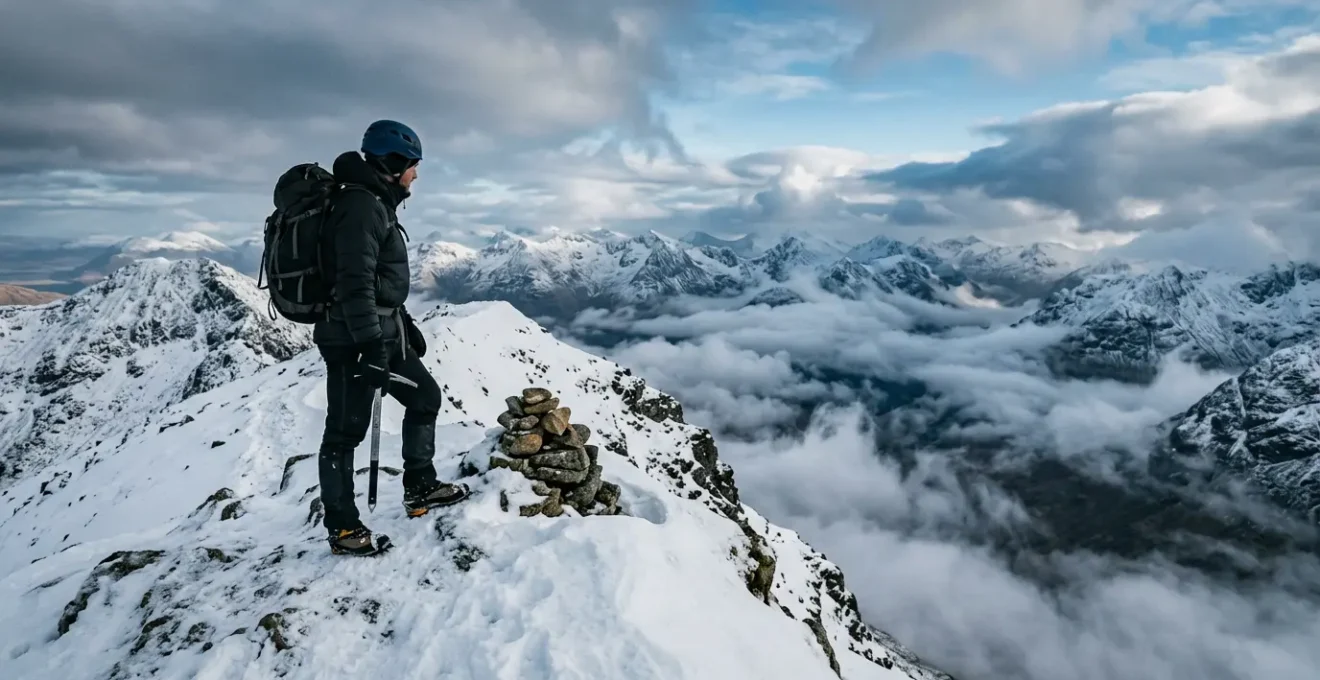
The allure of a snow-dusted Scottish peak is undeniable. For a confident summer hiker, it feels like the next logical step. Yet, standing at the base, gazing up at the ice and listening to the wind, that confidence can quickly curdle into a very real and sensible fear. Many will tell you the solution is simply to buy more gear: get the crampons, get the ice axe, and you’re set. This advice is not only incomplete; it’s dangerous. It mistakes equipment for expertise and ignores the fundamental shift in thinking required to operate safely in the unforgiving beauty of a winter mountain environment.
This is where so many aspiring winter walkers make their first mistake. They believe winter hiking is an extension of summer hiking, just with more layers. The truth is, it’s an entirely different discipline. It’s a game of chess against the elements where your most critical piece of equipment is your decision-making process. The objective is not just to reach the summit, but to return safely, and that requires a new level of self-awareness, planning, and respect for the mountain. It’s about building a robust personal safety system, long before your boots ever touch the snow.
This guide is built from years of leading nervous first-timers onto their first winter Munro. We will move beyond gear lists to focus on the core principles of safety. We will analyse what makes a good first objective, manage the psychological challenges of the mountain, master navigation in zero visibility, and build a training plan that prepares you for the unique demands of the Highlands, even if you live in a perfectly flat city. It’s time to replace fear with a well-earned “competence confidence”.
To navigate this transition from summer walker to winter mountaineer, we will break down the essential components of a safe and rewarding journey. The following sections provide a structured path, covering everything from your very first peak to the foundational skills that will serve you for a lifetime in the mountains.
Summary: A Beginner’s Strategic Path to Safe Winter Munro Bagging
- Ben Lomond or Schiehallion: Which Is the Best First Munro?
- Why Do Some Baggers Keep Their Final Munro Secret Until the End?
- The ‘False Summit’ Despair: How to Keep Going When the Peak Isn’t the Peak?
- Whiteout Navigation: What to Do When the Cloud Drops Instantly?
- Crampons or Ice Axe: Which Should You Buy First for Winter Munros?
- OS Maps App vs Paper Map: Which to Trust When Batteries Die?
- Buying vs Renting Gear: What Makes Sense for a 2-Week Adventure Trip?
- How to Train for Highland Hiking If You Live in a Flat City?
Ben Lomond or Schiehallion: Which Is the Best First Munro?
The question of the “best” first winter Munro is a classic one, and the debate often centres on Ben Lomond and Schiehallion. To make the right choice, you must look beyond their summer reputation and assess them through the lens of a winter risk ledger. Ben Lomond, the most southerly Munro, is incredibly popular, attracting around 30,000 people annually. Its well-defined “tourist path” can lull you into a false sense of security. In winter, this path becomes a channel for hard-packed ice, often dangerously slick and requiring flawless crampon technique.
Schiehallion, the “Fairy Hill of the Caledonians,” presents a different challenge. Its beautifully constructed path on the lower slopes gives way to a vast, disorienting summit plateau of frost-shattered quartzite boulders. In clear weather, it’s a playground; in a whiteout, it’s a navigational nightmare with few distinguishing features. Choosing between them isn’t about which is “easier,” but which type of risk you are better prepared to manage. Are you more confident with steep, icy terrain underfoot (Ben Lomond) or with complex navigation in low visibility (Schiehallion)?
This visual contrast highlights the core dilemma. Ben Lomond’s risk is often technical and immediate—a slip on the icy path. Schiehallion’s risk is strategic—a navigational error on the boulder field that could lead you miles off course. For a first winter outing, the decision should be based on a frank assessment of your current skills. A well-defined path, even if icy, may present a more manageable challenge for a beginner than a featureless plateau where your life depends entirely on your compass work. Your first objective should be chosen to test your skills, not to overwhelm them.
Why Do Some Baggers Keep Their Final Munro Secret Until the End?
Munro bagging is a deeply personal pursuit. While it starts as a simple list of peaks over 3,000 feet, it evolves into a multi-year journey across the breadth of Scotland. The tradition itself is rich with history, dating back to the first “compleater,” Rev A E Robertson, in 1901. Today, the number of people who have registered their completion stands at just over 7,392 people, a testament to the dedication required.
The first person to become a ‘compleater’ (the name given to people who bag them all) was Rev A E Robertson in 1901
– National Trust for Scotland, A guide to Munro-bagging
This small number highlights why the final Munro, or “compleation,” becomes such a significant event. For many, it’s the culmination of years of effort, shared experiences with friends, and quiet moments of solitude. Keeping the final Munro a secret until the end is a way of preserving the personal nature of this journey. It prevents the final climb from becoming a public spectacle and allows the bagger to choose who they share that deeply meaningful moment with. It might be a quiet, reflective solo trip on an obscure peak, or a celebration with close friends and family who have supported them throughout their quest.
The secrecy is not about elitism; it’s about protecting the emotional core of the achievement. After hundreds of ascents, facing everything from glorious inversions to brutal storms, the final peak is more than just a number. It’s a symbol of perseverance, a repository of memories, and a final, quiet conversation with the landscape that has defined so much of their life. By keeping it private, they ensure the experience remains authentic to them, a fittingly personal end to an epic Scottish pilgrimage.
The ‘False Summit’ Despair: How to Keep Going When the Peak Isn’t the Peak?
There are few moments in hiking as psychologically taxing as the false summit. You’ve been pushing hard, you see the skyline, you believe you’re there… only to crest the ridge and see the true peak looming even further away. In winter, this experience is magnified. Your energy reserves are finite, the weather can turn in an instant, and “decision fatigue” begins to set in. Each false summit drains not just physical energy, but mental resilience.
This feeling is a common rite of passage for many beginners. As one walker notes about their first ascent:
If you, like me, decide Ben Lomond is your first Munro then be prepared for stunning views over Loch Lomond. But also a steep hike with false summits and plenty of snack stops!
The key to overcoming this “despair” is not brute force, but strategy. First, anticipate it. When planning your route with a map, study the contour lines. Tightly packed contours followed by a flatter section, then more tight contours, is a classic sign of a false summit. Knowing they are coming removes the element of surprise. Second, you must manage your energy with ruthless efficiency. Your goal is not to get to the top as fast as possible, but to arrive at every stage—including the actual summit and, crucially, the car park at the end—with reserves to spare. This means having a pre-defined nutrition and hydration plan.
Your Action Plan: Energy Management for Winter Munros
- Pack lightweight, high-energy foods that are easy to eat with gloves on.
- Bring peppermint tea in a flask for a warm, morale-boosting drink at the summit or a key stop.
- Plan regular, timed stops to assess your energy levels against your pre-planned turnaround time.
- Pack a separate set of emergency snacks specifically for the descent; this is when most accidents happen.
- Include quick-energy items like gels, nuts, or energy bars for an immediate boost when facing an unexpected climb.
Whiteout Navigation: What to Do When the Cloud Drops Instantly?
A sudden whiteout is one of the most disorienting and dangerous situations in the winter mountains. One moment you have a vista, the next your world shrinks to a few feet of swirling snow. All features vanish, your sense of direction evaporates, and panic is a very real threat. In this moment, your technology can and will fail. Your safety depends entirely on your preparation and your mastery of fundamental skills. This is where a potential “system failure” begins—a chain of small errors leading to a serious incident.
The rise in popularity of winter activities means more people are exposed to these risks. As highlighted in a report on mountain safety, experts warn that many accidents are avoidable with greater knowledge and care. The article points out that a ‘very challenging winter’ for avalanche risk, coupled with increased participation, means “greater numbers are at hazard.” It stresses that many incidents could have been prevented if participants had simply “paused to consider” the risks. A whiteout is a prime example of a moment that demands you pause, stop, and think, rather than rushing into a mistake.
When the cloud drops, your first action is to stop. Do not move. The second is to trust your compass, not your instincts. This is where a comparison of navigation tools becomes critical. While a smartphone or GPS is useful for a quick location fix in good conditions, they are dangerously unreliable in a winter whiteout. Batteries die in the cold, touchscreens fail with gloves, and electronics can simply break. The paper map and compass are your lifeline.
This table from a beginner’s guide starkly illustrates the trade-offs, showing why traditional tools are non-negotiable. Mastering their use in zero visibility—taking a bearing, pacing, and handrailing features—is an essential skill that must be practiced in a safe environment before you need it for real.
| Tool | Advantages | Winter Limitations |
|---|---|---|
| Smartphone GPS | Quick location fix, easy interface | Freezes in extreme cold, touchscreen fails with gloves |
| Dedicated GPS Device | More robust, longer battery | Can still fail in extreme conditions |
| Paper Map & Compass | Never fails, shows big picture | Requires skill to use in zero visibility |
Crampons or Ice Axe: Which Should You Buy First for Winter Munros?
For the beginner, the question of which piece of winter hardware to buy first—crampons or an ice axe—is common. The answer requires understanding that they are two parts of a single safety system. They are not independent tools; they work in concert. As one guide aptly puts it, “Winter mountaineering requires a different set of skills and additional equipment such as crampons, an ice axe and the knowledge of how to use them.” The emphasis is on the knowledge of how to use them.
An ice axe’s primary safety function is self-arrest: stopping a slip from turning into an uncontrollable slide down a steep, icy slope. Crampons provide traction, preventing that slip from happening in the first place. If forced to choose one to acquire first, the logical answer is the ice axe. You must learn how to stop yourself before you venture onto terrain so steep that you need crampons to ascend it. A winter skills course is the only safe environment to learn and practice self-arrest until it becomes muscle memory.
However, this “which first” question is slightly flawed for a true beginner. A better approach is to rent both. Specialist outdoor shops, particularly in hubs like Aviemore and Fort William, offer equipment hire. This is a critical step for a novice. Renting allows you to try different models and, more importantly, to attend a winter skills course fully equipped without a huge financial outlay. As rental providers like Ellis Brigham note, participation in these activities is hazardous, and it is the “individual’s responsibility to learn and understand the proper techniques.” Renting gives you the tools to learn those techniques safely.
So, the answer isn’t to buy an ice axe first. The answer is to first invest in training, and rent the necessary gear—both the axe and crampons—to get the most out of that training. Only once you have the skills should you consider buying the equipment that best suits you. Competence must always precede the purchase.
OS Maps App vs Paper Map: Which to Trust When Batteries Die?
In the digital age, it’s tempting to rely solely on a smartphone’s GPS and a mapping app. They are convenient and offer a comforting “you are here” dot. However, in a Scottish winter, trusting your phone as your sole navigation tool is a gamble you cannot afford to take. The primary reason is simple and brutal: batteries fail catastrophically in the cold. A phone can go from 100% charged to dead in minutes when exposed to freezing temperatures and wind. Keeping it in an inside pocket and carrying a power bank are essential mitigation tactics, but they are not foolproof.
This leads to a non-negotiable rule of winter mountaineering: you must carry a paper Ordnance Survey (OS) map of the area and a compass. Furthermore, you must know how to use them proficiently. The idea that you can “figure it out” on the hill is a dangerous fantasy. If you don’t possess basic map reading skills, you simply shouldn’t be out there. The responsible first step is to get a map of your local park or low-level hills and practice. Correlate the features on the map with the landscape around you. Take bearings. Learn what the contour lines actually represent on the ground. This practice builds the foundational “competence confidence” you need.
Beyond the battery issue, a paper map provides something a phone screen cannot: the big picture. When things go wrong, you need to see the entire landscape to make strategic decisions. Where is the nearest escape route? Is there a lower, safer ridge to descend on? What major features, like a forest or a river, can I use as a “catching feature” if I get lost? A small phone screen, endlessly zoomed in on your position, robs you of this crucial context. The paper map is your strategic overview, the tool that allows you to think several steps ahead of the mountain.
Buying vs Renting Gear: What Makes Sense for a 2-Week Adventure Trip?
For a visiting hiker planning a two-week winter trip to Scotland, the buy-versus-rent dilemma is a practical and financial puzzle. The allure of owning shiny new gear is strong, but a pragmatic assessment often points towards renting. The essential winter trio—B3/B2 rated boots, crampons, and an ice axe—represents a significant investment, often running into many hundreds of pounds. If you are unsure how often you will use this specialist equipment after your trip, renting is almost always the more sensible financial decision.
Beyond the initial cost, consider the logistics. Flying with an ice axe and other sharp mountaineering gear can be complicated. Renting from a local shop near your base in the Highlands (like Aviemore, Fort William, or the Cairngorms) eliminates this hassle. You can reserve gear in advance and have it professionally fitted, ensuring your boots are comfortable and your crampons are correctly adjusted for them. This expert fitting is a safety benefit that beginners often underestimate. Ill-fitting boots can ruin a trip, while poorly adjusted crampons can be genuinely dangerous.
While the cost savings are the primary driver, renting also offers flexibility. It allows you to try high-quality gear from different brands. You might discover you prefer the swing of a certain ice axe or the fit of a particular boot brand, valuable information for when you do decide to buy. Furthermore, many Scottish rental shops cater to groups and multi-day hires, with some offering discounts for multi-item rentals, making the proposition even more attractive for a fortnight-long adventure. For a short, intensive trip, renting frees up capital for other essentials, like hiring a guide for a day or attending a winter skills course—investments that deliver a far greater return in safety and enjoyment than owning gear you may rarely use again.
Key Takeaways
- Your mindset is your most important safety tool; winter mountaineering is a discipline of risk management, not an extreme sport.
- Mastery of a paper map and compass is non-negotiable. Technology is a backup, never the primary system.
- Physical fitness is foundational, and specific training is essential to prepare your body for the unique demands of steep, snowy terrain.
How to Train for Highland Hiking If You Live in a Flat City?
One of the biggest mental blocks for aspiring winter mountaineers is the belief that living in a flat city makes effective training impossible. This is a misconception. While you can’t replicate the grandeur of the Highlands, you can absolutely simulate the physical stresses and build the specific fitness required. The key is to shift your focus from “hiking” to targeted, functional training. Your goal is to build leg strength, core stability, and, most importantly, cardiovascular endurance for sustained uphill efforts.
You don’t need a mountain to train for one. Any hill, or even a tall building’s stairwell, can become your training ground. The most effective urban training involves adding weight and duration. Load a backpack with 8-10kg (the approximate weight of a winter day pack) and find some stairs. Stadium steps, office block stairwells, or even a simple “step-up” box at the gym are invaluable tools. This isn’t about speed; it’s about maintaining a steady, relentless pace for an extended period. This directly mimics the “engine” you need for a long Munro ascent.
Furthermore, you must train for the descent. Walking downhill, especially on steep or uneven ground, uses your muscles differently and is a major source of fatigue and injury. Box step-downs or walking down long flights of stairs are excellent ways to prepare your quadriceps for this load. The following table provides a direct translation of urban exercises into their mountain equivalents, forming the basis of a solid city-based training plan.
| Urban Training | Mountain Equivalent | Duration |
|---|---|---|
| Stairmaster with weighted pack | Sustained uphill climbing | 2+ hours |
| Stadium stairs intervals | Steep ascent sections | 45-60 minutes |
| Long park walks in all weather | Endurance and weather adaptation | 4-6 hours |
| Box step-downs | Descent muscle training | 30 minutes |
Finally, embrace the weather. Deliberately going for long walks in the rain and wind builds mental toughness and tests your waterproof gear in a low-risk environment. This physical preparation is your first step in building the discipline of a mountaineer. It proves you have the commitment required, long before you set foot in Scotland.
By transforming your local environment into a training ground, you are not just building muscle; you are building the mindset and resilience that form the true foundation of winter safety. Start this training plan today; it is the most important first step you can take towards the summit.