The most effective insurance for your Scottish adventure isn’t a policy, but a proactive risk-mitigation mindset that prevents incidents before they happen.
- Local knowledge is non-negotiable: Understand specific risks like summer hypothermia and cold-water shock that generic advice misses.
- Your choices are your primary defense: Vetting guides and selecting the right gear are critical risk-control decisions that act as your first layer of safety.
Recommendation: Use this guide to build your personalized risk-management plan, ensuring your formal insurance policy remains your last, not first, line of defense.
The allure of Scotland is undeniable for an adventure seeker. You picture yourself navigating a deep canyon, scaling a rugged Highland cliff, or kayaking across a misty loch. As an insurance broker specializing in high-risk travel, I see clients from the EU and USA every day with these same dreams. Their first question is almost always about insurance coverage, driven by a valid fear of exorbitant medical costs far from home. They want a policy that covers everything.
While having robust insurance is non-negotiable, focusing solely on the policy is a fundamental mistake. The common advice is to “get good insurance,” but this misses the most critical point. The best way to manage your risk and financial exposure in the Scottish wilderness is not by relying on your insurance to save you, but by preparing so thoroughly that you’re unlikely to ever need it. The real insurance is knowledge and preparation.
This guide adopts a different perspective. Instead of just discussing policy clauses, we will delve into the on-the-ground risks unique to Scotland that most travel guides overlook. We’ll build your “proactive prevention” plan, covering weather, guide selection, gear, and physical training. This is the risk-mitigation mindset that truly protects you. Your insurance policy then becomes what it should be: a powerful, essential safety net for the truly unforeseeable, not a substitute for sound judgment and preparation.
This article will walk you through the core components of this risk-mitigation strategy. By understanding how to prevent an incident, you’ll be in the strongest possible position to select an insurance policy that truly complements your adventure, providing peace of mind without creating a false sense of security.
Summary: How to Insure High-Risk Outdoor Activities in Scotland for Non-Residents?
- Why Summer Weather in Scotland Can Still Cause Hypothermia?
- Accredited vs Freelance Guides: Who to Trust for Sea Kayaking?
- Buying vs Renting Gear: What Makes Sense for a 2-Week Adventure Trip?
- The Footwear Error That Ruins 30% of West Highland Way Attempts
- When to Schedule Canyoning to Avoid Low Water Levels?
- The Check-In Protocol That Saves Lives for Solo Hikers
- The ‘Umbumbles’ and Stumbles: Early Signs of Cold Water Shock
- How to Train for Highland Hiking If You Live in a Flat City?
Why Summer Weather in Scotland Can Still Cause Hypothermia?
One of the biggest misconceptions for visitors planning a summer trip to Scotland is underestimating the cold. You might see a forecast for 15°C (59°F) in Glasgow and pack accordingly, not realizing that mountain environments operate under entirely different rules. The primary danger isn’t just the ambient temperature, but the combination of wind and wetness, which accelerates heat loss from the body at an alarming rate. This is how hypothermia becomes a serious threat, even in July.
The key principle to understand is wind chill. Scottish mountain weather experts note that on a summit, you must always be prepared for conditions significantly worse than in the glen. According to analysis of Scottish mountain weather, it’s common to experience a temperature drop of 10°C combined with 40mph winds, which can make it feel sub-zero. When you’re soaked from a sudden downpour—a near-daily occurrence—your body’s ability to retain heat plummets. This is the classic recipe for hypothermia.
Your first layer of “insurance” against this is not a policy, but your packing list. Proactive prevention means carrying the right gear regardless of the morning forecast. This includes:
- Waterproof and Windproof Shell Layers: Your outer jacket and trousers are your primary shield. They must be fully waterproof, not just water-resistant.
- Insulated Layers: Carry multiple fleece or synthetic insulated layers. Avoid cotton, as it retains moisture and chills you.
- A “Bothy Bag”: This is a simple, lightweight emergency shelter that can be a lifesaver if you’re forced to stop in bad weather.
- Spare Hat and Gloves: You lose a significant amount of heat through your head and hands. A dry pair can make a huge difference.
- High-Energy Food: Your body needs fuel to generate heat. Carry snacks that are easy to eat on the move.
Thinking this way shifts your mindset. You are no longer a tourist hoping for good weather; you are an adventurer actively managing a known risk. This preparation is the most effective way to prevent a situation that could lead to a medical emergency and an insurance claim.
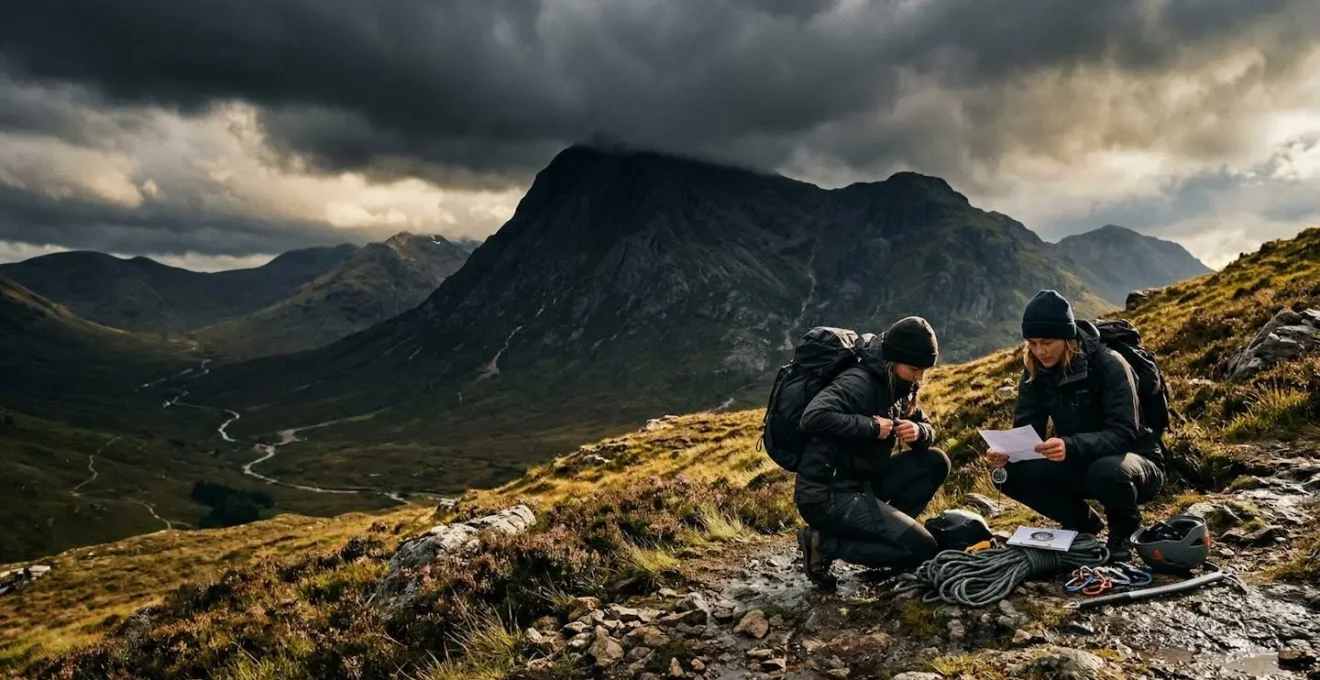
Accredited vs Freelance Guides: Who to Trust for Sea Kayaking?
For technical activities like sea kayaking or climbing, hiring a guide seems like a straightforward way to mitigate risk. However, the choice between a guide from an accredited company and a freelance instructor can have significant implications for your safety and liability. From an insurance perspective, this decision is a critical part of your risk management strategy. It’s not just about finding someone who knows the route; it’s about ensuring they have the professional framework to back it up.
Accredited guides, often associated with a National Governing Body (NGB) like the Scottish Canoe Association (SCA), are held to a high standard. They must maintain specific qualifications, undergo continuous professional development, and hold robust insurance. This is where the distinction becomes crucial. A standard Public Liability policy might not be enough. As a case study on instructor insurance reveals, many policies do not cover injury from wrongful advice, a critical detail for activities that depend on clear communication. A professional guide service understands these nuances and invests in comprehensive professional indemnity and liability insurance.
This doesn’t mean all freelance guides are untrustworthy, but it does mean the burden of verification falls on you. Before hiring a non-accredited or independent guide, you must perform your own due diligence. This is an active form of risk control. Ask for proof of their qualifications, first-aid certification, and, most importantly, their insurance. A professional will have this information readily available and will not be offended by your asking. If they are evasive, that is a major red flag.
Ultimately, choosing a guide is an informed decision, not a leap of faith. Opting for a guide from a well-established, accredited company provides a built-in layer of assurance. If you choose a freelancer, you must be prepared to vet them thoroughly. This scrutiny is a core part of your proactive prevention plan, ensuring the person you entrust with your safety is as prepared as you are.
Buying vs Renting Gear: What Makes Sense for a 2-Week Adventure Trip?
For a non-resident, the logistics of gear can be a headache. Do you spend a fortune on equipment you might only use once, and then pay excess baggage fees to fly it to Scotland? Or do you rent locally and risk using unfamiliar or ill-fitting items? This decision isn’t just about cost; it’s a fundamental risk management choice. The wrong gear can lead directly to an incident, and as we know, a simple slip is the most common cause of mountain rescue callouts.
The most critical items—those directly responsible for your safety and comfort—should be purchased and broken in at home. This applies above all to hiking boots. Footwear that hasn’t been properly worn in is a primary cause of blisters and foot injuries that can ruin a trip. Similarly, a high-quality hardshell waterproof jacket is a personal investment in your safety against hypothermia. These items can be worn on the plane to avoid baggage fees.
Conversely, bulky or less critical items are prime candidates for local rental. A large backpack (65L), a sleeping bag, and camping equipment can often be rented from outdoor shops in hubs like Fort William or Aviemore. This saves you the hassle and cost of transport. However, “renting” doesn’t mean “forgetting.” You should research rental companies in advance, read reviews, and reserve your gear to ensure availability and quality.
To put this in perspective, here is a breakdown of the typical costs and recommendations:
| Gear Item | Purchase Cost | 2-Week Rental (Fort William) | Excess Baggage Fee | Recommendation |
|---|---|---|---|---|
| Hiking Boots | £150-250 | £70-100 | £0 (wear them) | Buy & break in at home |
| Hardshell Jacket | £200-400 | £80-120 | £0 (wear/carry-on) | Buy if none owned |
| 65L Backpack | £150-300 | £60-90 | £50-150 | Rent locally |
| Sleeping Bag | £100-300 | £40-60 | Included in pack | Rent (hygiene permitting) |
By adopting this hybrid buy-and-rent strategy, you take direct control over the most important safety equipment while pragmatically managing the cost and logistics of the rest. This informed decision-making is a cornerstone of the risk-mitigation mindset, directly reducing your chances of a gear-related incident.
The Footwear Error That Ruins 30% of West Highland Way Attempts
While the “30%” figure is anecdotal, it reflects a stark reality witnessed by mountain rescue teams and long-distance trail veterans: improper footwear and a lack of foot conditioning are the single biggest trip-enders. Many adventurers, especially those from flatter regions, invest in top-of-the-line hiking boots but make a critical error: they don’t prepare their feet for the unique demands of Scottish terrain. The West Highland Way, with its hard-packed military roads and rocky paths, is notoriously brutal on unprepared feet.
The mistake isn’t buying the wrong boots; it’s the assumption that the boots do all the work. Your feet are part of your equipment, and they require training just like your cardiovascular system. The impact of walking for 6-8 hours a day with a weighted pack on varied terrain creates friction and pressure points that an hour-long walk in a city park simply cannot replicate. This leads to debilitating blisters, tendonitis, and stress fractures—all of which are preventable.
Proactive prevention involves a dedicated “foot-hardening” program. This isn’t just about wearing your boots around the house. It’s a structured plan to simulate the stresses of the trail. The goal is to build resilience in the skin, muscles, and tendons of your feet and ankles. A typical plan should start at least four weeks before your trip:
- Week 1: Start with daily one-hour walks on flat ground wearing your hiking boots and the socks you plan to use. This identifies initial friction spots.
- Week 2: Increase walks to 90 minutes, introduce hills, and add a small amount of weight (5kg/11lbs) to your backpack.
- Week 3: Progress to two-hour walks on more varied terrain (trails, uneven ground) with a heavier pack (10kg/22lbs).
- Week 4: Undertake at least one full-day hike with your planned trip weight. If possible, try to walk in wet conditions to test how your feet and boots perform.
This process allows you to make adjustments, find the right sock combinations (liners can be a game-changer), and apply preventative taping to known hotspots *before* you’re miles from the nearest road. As stated in safety advice for the region, sturdy hiking boots with a good grip are essential, but they are only effective if your feet are conditioned to handle them. This training is your insurance against a preventable, trip-ending injury.
When to Schedule Canyoning to Avoid Low Water Levels?
Scheduling is another form of risk management that is often overlooked. For water-based activities like canyoning or whitewater kayaking, the time of year you book your trip can be the difference between an exhilarating adventure and a disappointing, or even dangerous, experience. In Scotland, water levels are dictated by a combination of snowmelt and rainfall, creating a distinct seasonal pattern that you must factor into your plans.
Generally, the best and most reliable water levels for canyoning are found in the spring and early summer (April to June). During this period, the melting winter snowpack from the Highlands feeds the rivers, ensuring a good, consistent flow. This creates the dynamic environment that makes canyoning so exciting: flowing water, deep pools for jumping, and natural water slides.
As summer progresses into July and August, especially after a dry spell, many of the smaller canyons can suffer from low water levels. This doesn’t just reduce the fun; it can increase the risk. Jumps that were safe into a deep pool in June may become hazardous with a lower water level. What was once a slide might become a bumpy, rocky descent. While some canyons hold water better than others, this is a significant variable to consider.
Conversely, late autumn can bring the opposite problem. The weather becomes more volatile, and heavy rainfall can turn a manageable canyon into a raging, inescapable torrent. As mountaineering safety advice highlights, heavy or prolonged rain can make streams impossible to cross. The same principle applies tenfold inside a canyon. Always check with your guide company about their protocols for heavy rain and be prepared for last-minute cancellations—a cancelled trip is infinitely better than a rescue.
Therefore, your “insurance” in this context is timing. By aiming for the prime window of April to June, you maximize your chances of ideal conditions. If you must travel in late summer, choose a guide company that operates in larger, more reliable river systems and discuss low-water contingency plans with them before you book.
The Check-In Protocol That Saves Lives for Solo Hikers
For the solo adventurer, freedom and solitude are the goals. However, this independence comes with a heightened responsibility. When you are alone, there is no one to notice if you are late, injured, or disoriented. This is where a rigid, non-negotiable check-in protocol becomes the most important piece of safety equipment you have. It is your lifeline to the outside world, and from an insurance standpoint, it is the ultimate form of proactive risk mitigation.
Mountain Rescue teams are elite professionals, but they can only help you if they know you are in trouble. In 2024 alone, Scottish Mountain Rescue teams responded to 636 incidents, many of which involved overdue solo hikers. A proper check-in protocol turns a vague worry (“I wonder where they are?”) into actionable information that can trigger a swift and targeted rescue. Leaving a note saying “gone hiking in Glencoe” is not enough.
Your protocol must be detailed and shared with a reliable contact who is not on the mountain with you. This could be your accommodation host, a friend back home, or a family member. Critically, this person must understand the plan and agree to act. As an expert from Trek Scotland points out, the rescue itself is free for anyone, anywhere in the world, but this incredible service depends on timely alerts.
Mountain Rescue in Scotland is a highly professional voluntary service which is dependent on grants and donations. At present it is free for all and there is no charge made for being rescued, including evacuation by helicopter. This service includes Mountain Trekkers from anywhere in the world.
– Trek Scotland, Trek Scotland Safety Policy
This generous provision removes the fear of a crippling rescue bill, a major concern for non-residents. However, it reinforces the moral obligation to be as prepared as possible. Your check-in protocol is the key to fulfilling that obligation.
Your Essential Solo Hiker Check-In Protocol
- Leave a Detailed Route Card: Provide your route, including start/end points, key grid references, and intended timings, with your accommodation or trusted contact.
- Set a “Panic Time”: Agree on a specific, non-negotiable time at which, if you have not checked in, your contact will call emergency services (dial 999 and ask for Police, then Mountain Rescue).
- Include Escape Routes: Your plan should detail alternative, shorter routes you might take in case of bad weather or fatigue.
- Share a GPS Tracker Link: If using a satellite device like a Garmin inReach or SPOT, share the live tracking link with your contact. This is the gold standard for solo safety.
- Plan Check-In Points: If your route has intermittent phone signal, pre-determine waypoints (e.g., a summit, a bothy) where you will attempt to send a check-in text.
The ‘Umbumbles’ and Stumbles: Early Signs of Cold Water Shock
For anyone planning canyoning, coasteering, or even a brave dip in a loch, understanding the body’s reaction to cold water is a critical piece of hyper-local knowledge. The danger is not just hypothermia, which takes time to develop, but the immediate and powerful effects of cold water shock. This involuntary reaction can be fatal in minutes if not properly managed. Recognizing the early signs in yourself and others is a vital safety skill.
The initial immersion in cold Scottish water (often 4-10°C / 39-50°F) triggers an uncontrollable gasp for air, followed by hyperventilation. If your head is underwater at this moment, it can lead to drowning. The key is to survive this first minute. The “1-10-1” rule is a crucial mental model for survival:
- 1 Minute: You have about one minute to get your breathing under control. Fight the panic, focus on exhaling, and keep your airway clear of the water.
- 10 Minutes: You will have approximately ten minutes of meaningful, useful movement before the cold begins to seriously incapacitate your muscles. Use this time to get out of the water or secure yourself.
- 1 Hour: It can take up to an hour before you become unconscious due to hypothermia, which is defined as a core body temperature below 35°C.
Even after you’re out of the water, the danger isn’t over. One of the most telling, and strangely named, signs of advancing hypothermia is the “umbumbles”: fumbling, mumbling, stumbling, and grumbling. It describes the loss of fine motor coordination (fumbling with a zip), slurred speech, poor coordination, and a change in mood or apathy. If you or a partner starts exhibiting these symptoms, it is an urgent red flag. You must take immediate action to warm them up by adding layers, getting them into a shelter, and giving them warm, sweet drinks.
Knowing these signs is a form of proactive insurance. By recognizing the ‘umbumbles’ or understanding the 1-10-1 rule, you can intervene long before a situation becomes a life-threatening emergency. It’s the kind of specific, on-the-ground knowledge that no insurance policy can provide, but which makes you immeasurably safer.
Key Takeaways
- Proactive Prevention is Your Primary Insurance: Your most effective safety tool isn’t your policy document, but your preparation. A risk-mitigation mindset, focused on preventing incidents, is paramount.
- Hyper-Local Knowledge is Non-Negotiable: Scotland’s risks (summer hypothermia, unpredictable water levels, specific terrain challenges) require more than generic advice. Understanding the local context is crucial.
- Your Choices Are Your First Line of Defense: Every decision—from the guide you hire and the boots you wear to the time of year you travel—is a critical risk-control measure. Your insurance is the final safety net, not a substitute for sound judgment.
How to Train for Highland Hiking If You Live in a Flat City?
Your physical condition is the final, and perhaps most important, piece of your risk management plan. A good fitness level doesn’t just make the hiking more enjoyable; it directly reduces your risk of injury and exhaustion, which are precursors to more serious incidents. For adventurers living in flat cities in the USA or mainland Europe, replicating the demands of a Scottish mountain day can seem impossible. However, with a targeted training program, you can arrive in the Highlands well-prepared.
Highland hiking is a full-body workout that challenges your cardiovascular system, leg strength, and, crucially, your stabilizing muscles and balance. The uneven, often boggy terrain requires constant micro-adjustments that you simply don’t make on paved surfaces. Training must therefore focus on three key areas: endurance, eccentric strength, and stability.
You can effectively simulate these demands without a mountain in sight. A gym, a staircase, or even a park bench can become your training ground. Here is a sample urban training program:
- Stair Repeats: This is the single best way to simulate climbing. Spend 30-45 minutes walking up and down a tall flight of stairs, ideally wearing your weighted backpack. This builds cardiovascular endurance and leg strength.
- Weighted Step-Downs: To build eccentric strength (the force your muscles absorb on descents, which is where most fatigue and injuries occur), stand on a box or bench and step down slowly and with control. Perform 3 sets of 15 reps on each leg, wearing your pack.
- Treadmill Incline Walking: Set a treadmill to its highest incline (8-12%) and walk for 45-60 minutes. This is an excellent, low-impact way to build climbing endurance.
- Balance and Stability Work: Stand on one leg or use a balance board for several minutes each day. This strengthens the small stabilizing muscles around your ankles, which is your best defense against the ‘simple slips’ that cause so many injuries.
This physical preparation is the ultimate expression of the proactive prevention mindset. By investing the time to train your body for the specific challenges ahead, you are drastically reducing the likelihood of a stumble becoming a fall, or fatigue leading to a poor decision. You arrive not just with a good insurance policy, but with a body capable of meeting the demands of your adventure.
Now that you understand the real risks and how to manage them, you are in the strongest position to choose the right insurance. Review your adventure plans against these points, and seek a specialized policy that complements your thorough preparation, ensuring it acts as the true last resort safety net it’s meant to be.